Now that you have received a mini-drone from SIC-Lazaro, you are all set to begin flying with confidence, precision and responsiveness. Question: Are you ready for take off?
Assuming the answer is “yes,” here are five tips to better fly your new mini-drone:
-
- Start slow. The mini-drone is all charged up and ready to go, but try to resist the natural instinct to grab the controller and push this thing up as high as it can go. Hitting the ceiling at full speed is not the desired effect.
- Read the user manual. Again, our natural instinct is to just hit the throttle and see what it does, but remember that flying can be difficult! While the mini-drone is ready to do tricks and flips right out of the box, the operator may not be.
- Replace the propellers. After skipping tip one and two, you may have a broken propeller or two. Luckily, this mini drone comes with four replacement propellers. Simply pull straight up on the broken propeller to remove it and push on the new one.
- Learn some tricks. Now that you’re flying like a pro it’s time to learn some tricks. We recommend the flip trick. Instructions for this trick and others are included in the user manual, or you can check out this video.
- Call SIC-Lazaro. SIC-Lazaro may not be able to help you pilot your mini-drone, but when it comes to creating balance and stability with build-to-print and custom designed optimal-density counterweights, no one knows counterweights like SIC-Lazaro.
Otherwise, the following are some tips on how to cope by using your new mini-quadcopter:
THE BASICS
There is a front and a back to all mini-drones! The front of the mini-drone is the direction with the blue LEDs. The back of the mini-drone has red LEDs and the On/Off switch.
The right-hand control stick moves the mini-drone forward, backward, left and right. These directions will always be from the perspective of the mini-drone, no matter which way it is facing or has rotated.
The left-hand control stick on the transmitter controls the throttle (up/down) as well as the yaw, which controls the rotation (spin left or right) of the mini-drone.
CHARGING
Use the provided USB charging cable to charge your mini-drone from a computer. Do not attempt to use an iPhone/iPad, etc wall charger as that may damage the battery.
Never leave your charging mini-drone unattended or plugged in for longer than necessary. All lithium ion batteries can be dangerous if over charge, which may lead to a risk of fire.
The charging is complete when the LED light in the charging cable goes out.
GETTING UP AND RUNNING
Power on the mini-drone on a flat and level surface. Power on the transmitter (always ensure the left-hand stick is all the way at the bottom first). Now that both the mini-drone and transmitter are powered on, move the left-hand control stick all the way up and then all the way down. You should hear a series of beeps while doing so. When complete, all four lights on the mini-drone should be light solidly and not blinking. If still blinking, please retry. Your mini-drone is now armed and ready to fly!
FLYING BASICS
There is a front and a back to all mini-drones! The front of the mini-drone is the direction with the blue LEDs. The back of the mini-drone has red LEDs and the On/Off switch. The right-hand control stick moves the mini-drone forward, backward, left and right. The left-hand control stick on the transmitter controls the throttle (up/down) as well as the yaw, which controls the rotation (spin left or right) of the mini-drone. These movements of the mini-drone will always be from the perspective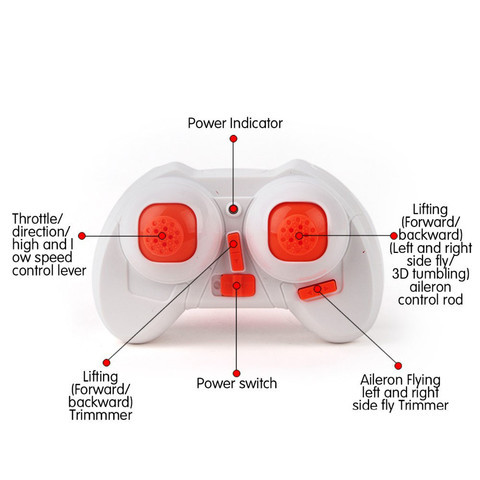 of the mini-drone, no matter which way it is facing or has rotated. These means that pushing forward on the control stick will always make the mini-drone move in the direction that the blue LEDs are facing. When learning to fly, try not to turn spin (yaw) the mini-drone so that the front is always facing the same direction.
As the mini-drone moves around, turn your body so that you are always facing the same direction that the mini-drone is facing. This helps to keep track of which direction is forward, backward, etc. The throttle is very sensitive, try using a very soft touch while learning how to fly. If you lose control, you can always power down the mini-drone by lowering the throttle all the way down, this will shut off the motors immediately. Under normal circumstances, it is usually better to cut the throttle and crash than to have the mini-drone fly away!
DOING FLIPS
To execute a flip, simply push the right-hand stick in (like you are pushing a button). You should hear a beep, which means you are ready to do a flip. Next, simply push the same stick in either of the four directions to make the mini-drone flip in that direction.
Always make sure that you are not too close to an object before conducting a flip. The mini-drone may gain or lose altitude or move sharply left or right while flipping.
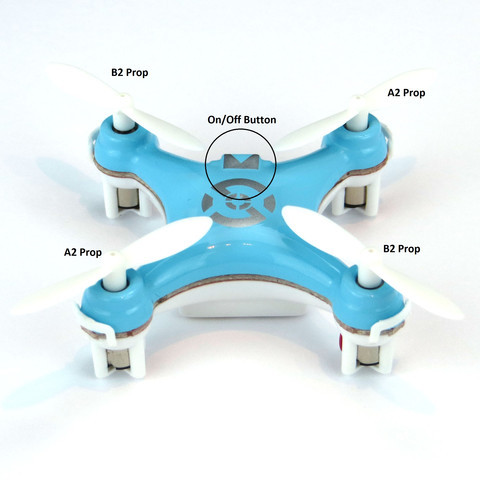
CHANGING THE PROPELLERS (Very important)
All mini-drones have two motors that spin clockwise and two that spin counterclockwise. Each of these motors also use a different propeller. If a propeller meant for counterclockwise direction is placed on a clockwise spinning motor, there will be no lift generated.
Each propeller is marked on its underside with either an A1, A2, B1 or B2 marking. The numbers are not important, however the letters are. These letters correspond to the direction in which the propeller is designed to spin.
When changing a propeller, always be sure to replace it with anther propeller with the same letter (again, do not worry about the numbers).- You can also use the picture below as a guide for which motors take which propellers. Please note where the on/off switch is in the picture to ensure that you are changing the correct ones.
RECALIBRATING THE GYROS
There are three ways to correct for calibration issues:
Automatically recalibrate – Power off the mini-drone, place it on a flat and level surface and then power it back on. Wait at least 3 seconds before attempting flight. The mini-drone should now be recalibrated
Manually recalibrate – While the mini-drone is turned on, place it on a flat and level surface. Push the left-hand control stick all the way to the bottom left corner and the right-hand control stick to the upper left corner and hold both sticks in those positions. The lights on the mini-drone should begin blinking quickly. Hold the sticks in that position for at least 4 seconds. The mini-drone should now be recalibrated
The paper trick – With the mini-drone copter off and on a flat and level surface, place a couple pieces of paper under the feet of the mini-drone in the direction that it tends to fly in. This will slightly lift one part of the mini-drone higher than the other side. Now power it on and let it automatically recalibrate. You can play with how many sheets of paper you use until the problem is solved.
USING THE TRIM CONTROLS
There are two sets of directional arrow buttons on the transmitter. Each arrow is a trim control to counteract the mini-drones movement either forward, backward, left or right.
If the mini-drone is drifting to the left, push the directional arrow pointing to the right. This will tell the mini-drone to adjust itself more to the right in order to compensate for the drifting to the left.- It is recommended that you only use one click at a time in to not overcompensate in any one direction.
With correct trimming, you should be able to get the mini-drone to hover fairly steadily.
TROUBLESHOOTING
Problem: One of the motors seems to be completely dead or is very hard to spin.
Solutions: Remove the propeller from the problem motor and put it back on, making sure that it is not pressed down too hard. Props which are pushed in too tight can jam the motor.
Problem: The mini-drone will not lift off or shoots off to one direction without leaving the ground.
Solution: This typically means that one or more of the props are not installed correctly (they do seem to come from the factory this way sometimes). Please see the above instructions for proper propeller placement.
Problem: One of the motors seems to stall when tilted slightly.
Solution: This may not mean there is anything wrong with the mini-drone. It has built-in gyroscopes that change power to the motors in order to maintain stability. If this does appear to be a problem, going through the manual recalibration will fix most issues related to this.
Problem: The mini-drone flies off in a certain direction all by itself.
Solutions:
- This typically means that the mini-drone is not calibrated. Please see the recalibration information above.
- You may need to use the trim controls to counteract the drift. Please see the section above regarding trim controls.
Problem: The mini-drone will not take off and only skims along the floor.
Solution: This typically means that one or more of the propellers is on incorrectly. Please see the Changing the Propellers section above.